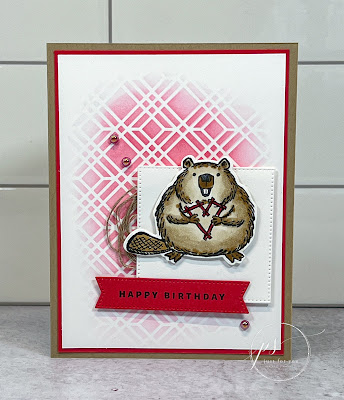
Today's card uses a set from the Online Exclusives. The fluffiest friends set is so cute and cuddly....those chubby little critters!
All images © 1990-2023 Stampin’ Up!®
Supplies:
·
Stamp Sets – Fluffiest
Friends (162846); Something
Fancy (160416)
·
Card Stock –
Sweet Sorbet (159268); Crumb Cake (120953); Basic White (159276)
·
Stamp Pads
– Memento Tuxedo Black (132708); Sweet Sorbet (159216)
·
Misc. – Fluffiest
Friends Dies (162849); Buy the
Bundle and save 10% (162850); Stylish Shapes Dies (159183);
Foursquare Decorative Masks (161285); Blending Brushes (153611); 2022-2024 In
Color Pearls (161621); Stampin’ Dimensionals (104430); Linen Thread (104199);
Multipurpose Liquid Glue (110755); Paper Snips Scissors (103579); Paper Trimmer
(152392); Stampin’ Cut & Emboss Machine (149653); Stampin’ Blends Combo
Packs: Pecan Pie (161674), Crumb Cake (154882), Sweet Sorbet (159224)
·
Buy
the Fluffiest Friends Bundle and save 10% (162850)
Measurements:
·
Crumb Cake: 8-1/2” x 5-1/2”
·
Sweet Sorbet: 5-1/4” x 4” and 1” x
3-1/4”
·
Basic White: 5-1/8” x 3-7/8”, 2-3/4” x
2-3/4” and scrap for stamped image
Instructions:
1.
Stamp the beaver image from the
Fluffiest Friends stamp set onto a scrap of Basic White card stock with Tuxedo
Black Memento ink. With the same ink, stamp “happy birthday” from the Something
Fancy stamp set on the small rectangle piece of Sweet Sorbet card stock.
2.
Color the beaver with Stampin’ Blends:
Crumb Cake for the body, Pecan Pie for the tail, feet, paws, nose and ears and
shadowing and Sweet Sorbet for the heart. Cut the beaver out using the
corresponding die from Fluffiest Friends.
3.
Use the Stylish Shapes dies to cut out
the greeting and square.
4.
With the Sweet Sorbet ink pad and a
blending brush, add color to the center of the Basic White card stock layer.
5.
Fold the Crumb Cake card stock in half
to make the card. With Multipurpose Liquid Glue, adhere the Sweet Sorbet and
Basic White card stock layers to the front of the card.
6.
Cut 20” of Linen Thread and loop it
four times before adhering to the back of the Basic White square with Stampin’
Dimensionals. Add additional Dimensionals to the back of the square and add it
to the card front.
7.
Add the beaver and greeting to the
card with additional Dimensionals.
8. To finish, add three Sweet Sorbet 2022-2024 In Color Pearls to the card.
This online exclusive set can be found here. It is available in a bundle format as well so you can have dies to cut them out with. If you plan to order, please use the host code: KUJ9E9GH
I hope you enjoyed the project tutorial for today. Have a blessed day and a wonderful weekend ahead.

No comments:
Post a Comment