Showing posts with label whisper white cs. Show all posts

Wednesday, October 3, 2018

Country Home

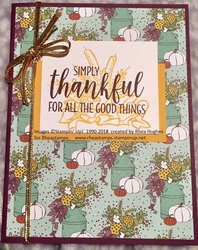
Good morning!  Today's post is a card that I recently made using the Country Lane Suite from the 2018 Holiday catalog.  I hope you enjoy it!  Here is the project:


Countryhome

Project Recipe:

  1. Cut blackberry bliss cs to make your base card.
  2. Cut your layer from the Country Lane designer series paper (dsp).
  3. Stamp the greeting in blackberry bliss ink and the cattail image in crushed curry ink onto white cardstock. Both of these stamps come from the Country home photopolymer stamp set. I used my stamparatus, but you don't have to.
  4. Fold base card in half, and add the country lane paper. You will layer the white stamped piece to the crushed curry leaving a border around three sides.
  5. Lastly add the gold cord around the card and tie a bow.


Product List

Sunday, June 29, 2014

Painter's tape technique

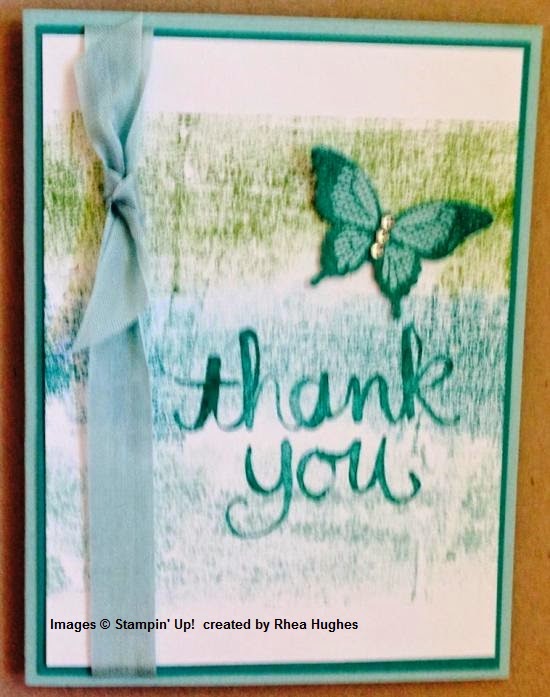
Today I am featuring an easy technique called the painter's tape technique.  It is fun and really pretty easy to do.  I got some painter's tape from the hardware store and decided to jump in and give this a try.  You just tear pieces of painter's tape that is longer than the cardstock you want to cover.   Then take the sticky side and apply ink to it by placing it directly on your inkpad, moving it to cover the entire piece except where you are holding it.  Then place it directly onto your cardstock and the ink transfers to the cardstock.  Then continue on, I worked from the bottom to top on my card.  So the mossy meadow was the first color I did, then moved onto lost lagoon, and finally crumb cake.  Here is my card:
 
 
After finishing with the tape and getting all three colors on there I took the World of Dreams stamp set and added the silhouette onto the left side stamping twice without re-inking the stamp so you get one darker image and one lighter image.  The greeting comes from the Wetlands stamp set.  I then added a little of the mossy meadow matching ribbon with some linen thread to the bottom of the card.  Here is a couple more cards with this same technique:
 

These cards use Wild Wasabi, Bermuda Bay, and Pool Party for ink colors.  The above card uses flowering flourishes, petite petals, and embellished events stamp sets.  The greeting was punched with the word window punch and modern label punch.  Pool party and Bermuda bay ribbons to match. 
 
This card uses the watercolor thank you and polka dot pieces stamp sets.  Rhinestones, elegant butterfly punch, and pool party seam binding ribbon to match.


What a fun technique!  Go give it a try!
Have a great Sunday and thanks for stopping by...

Tuesday, June 3, 2014

New Catalog Unveil!!

The new catalog in now available.  Woo Hoo!  I love this time of year and all the new items we have to choose from.  Today I am sharing a card made with a new hostess set--you are going to want to book a workshop or class to earn this one!  It is gorgeous.  I cased this card from a group that I belong to--thanks Maggie for the great inspiration.  I just changed a couple things and made it my own.  The basic layout is the same though. 


Here is what the new hostess set looks like and is available in wood or clear mount but only in the hostess section of the catalog. 
 
Bloom With Hope
 
This card also showcases some of the new 2014-2016 in colors which are called Hello Honey, Blackberry Bliss, Lost Lagoon,  Tangelo Twist, and Mossy Meadow.

This card uses blackberry bliss, mossy meadow and hello honey.  I used the markers to color the stamp, and then combined that with blackberry bliss cardstock, hello honey cardstock, and moonlight designer series  paper stack along with the luscious satin ribbons to match the in colors.  This ribbon is wonderful--so easy to work with. 

It is easy to get the two colors of ribbon implemented into the one tie,  just cut a strip of the hello honey ribbon and  place it over the first tie when tying the knot ribbon and then finish by making the second tie for the know and it secures it right in there.  Then take your ribbon scissors to trim the edges to match.  Yep, I have scissors just for ribbon so they don't get dulled by cutting cs or papers with them. 

Thanks for stopping by Btoday.  I hope you enjoyed the project.  Let me know if you need a catalog, you can leave a comment here or email me at rheastamps@hotmail.com
Until then you can view the catalog by clicking on the icon to the right side of my blog!

Have a great day!