Showing posts with label decorative label punch. Show all posts

Thursday, March 2, 2017

Avant Garden

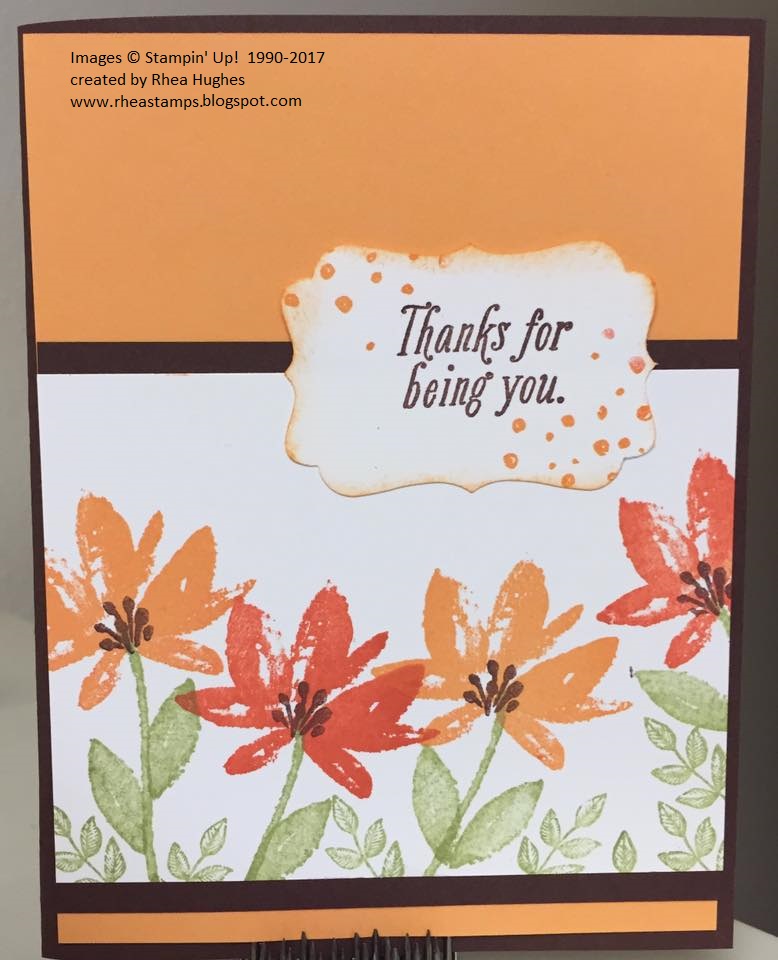
As promised I am posting the four cards I gave away at the quick card class on Monday night.  I used these as door prizes.

used the sale-a-bration set Avant Garden to create these cards.  Peek a boo Peach, Pear Pizzazz, Chocolate chip, and calypso coral are the colors used.

The greeting on this card comes from the Teeny Tiny Wishes set.  I used the classic label punch to punch it out with. The other cards all use greeting from the Avant Garden set.

Some calypso coral twine and pearls to embellish this one!


It has some cute little speckles in this stamp too!
Peekaboo Peach ruched ribbon.  I love this ribbon.  It's available in all the 2016-2018 in colors.
Thanks for stopping by today!

Saturday, September 5, 2015

Happy Fall!

We are feeling a lot like fall here in MT as this Labor Day weekend begins!  It's a cloudy, cool day with some rain showers out there.  The weather just said snow in the higher elevations.  We won't see that here where we live tho.  I'm not ready for snow!
 
 
Today's card looks like fall though.  I love the fall colors...


This card has several steps and some of my customers got to make this card a class recently.  First you will use the embossing buddy on the white cs layer and then stamp leaves from Lighthearted Leaves stamp set in versamark ink and sprinkle with white embossing powder and heat emboss them.  Then using sponges you will sponge the color over them.  I used old olive, hello honey, pumpkin pie, and Cajun craze.  After letting that dry a bit, we used the embossing buddy again over the white layer. 
 
The greeting was done by the thumping technique.  Ink the greeting in pumpkin pie and thump Cajun craze over the top with the brush tip end of a stampin write marker.  Stamp and punch it out.  I sponged the edges with some pumpkin pie ink.  Place on the card using dimensionals.


Now to get that splattered glitter look...
Using a lid to a button container or cottage cheese container you will take a little bit of the green tombow glue.  Next you will use an aqua painter from Stampin' Up! to add a little water to the glue to make it more of a liquid.  Mix it around and then by hitting the aqua painter against your finger you will splatter that glue liquid on the cardstock.  When  you get your desired look, sprinkle with the gold glitter.  Set aside for drying time.  This is soooooo pretty in real life!  Well worth the glitter mess you make!  LOL!
 
After dry, I added a little gold ribbon and then put it to a pumpkin pie base card.
 
Enjoy your Labor Day weekend!
 

Friday, October 31, 2014

So very grateful for YOU!!

As I continue thru this whole breast cancer trial...I wanted to take a moment to thank you all for being so understanding and patient.  I will be going in for hopefully...my last surgery in a week so I am busy getting ready for that.  I appreciate each and every one of you that has placed orders even tho I haven't been actively doing workshops, clubs and parties.  I hope to be able to hang on by placing orders until I can get back to actively teaching papercrafting again.  Hang with me, I will get there!

My stamina and energy are still pretty compromised and evenings are my worst time (which is when we usually did classes and clubs).  They keep telling me to be patient!  :-)

So today's card post represents how very grateful I am for all of you and it uses the Gorgeous Grunge set and the For All Things stamp set.  The color me Autumn washi tape goes with it all so well.

and since we had a blackberry bliss base card and it was so dark I did this on the inside:
Did the thumping technique with the markers here. 
 
As you get ready for your fall/winter stamping projects, let me know if you need to  place an order or you can go directly to my website to place your orders.  www.rheastamps.stampinup.net  Just click the shop now button and check with me to see if there is a hostess code open.  I will be finalizing an order today, October 31st!  Happy Halloween to all!


Wednesday, May 29, 2013

Ciao, Baby!

Today's post comes to you as I listen to it rain outside.  We are sooooo very thankful for the rain, the lack there of, was beginning to cause some stress on this ranch life.  We rely on stock water dams to water the cattle with and they were dry--they now have some water in them so that is a good thing!  It is also getting a lot greener around here with the moisture that has been coming our way--we hope it continues this wet cycle in the weather.  Now, time for the card for today's  post.
 

I designed this card for a make and take in the mail for my downline members.  So they got all the pieces cut and ready to go, they just had to stamp and assemble the card.  They got this Ciao, Baby stamp set earlier this year as a gift from me.  You can find it on page 16 of the spring mini catalog.  Hurry!  The last day to order from this catalog is May 31st!  I picked the floral district dsp and then chose my colors from that, using rich razzleberry, tangerine tango, and baja breeze.  The floral district dsp is retiring along with baja breeze color so that means the seam binding ribbon I used is going to be gone too.  Get it before it is gone on June 3rd!  You can place orders anytime on my website, www.rheastamps.stampinup.net
 
If you have any questions--feel free to contact me here or by email at rheastamps@hotmail.com
Have a fabulous day!


Saturday, October 13, 2012

Christmas Swap Card

Today's post is a card that I made to swap recently.  An easy layout that goes together nicely with vanilla, soft suede, and cherry cobbler for color theme.

I used the Delightful Decorations set, More Merry Messages set, and the Netting background stamp all from the regular catalog.  I use my Big Shot on most projects that I do anymore--not really sure how I lived without it???!  I die cut the scallop square and textured the polka dots on the soft suede piece with it.  The matching punch to the ornament saves cutting it out and also used the decorative label to punch out the netting stamp.  The piercing, crochet ribbon and pearl in the center of the ornament are the finishing touches to this card.  All supplies are from Stampin' Up! 2012-2013 catalog.
Have a fun weekend!  Thanks for stopping by for a minute today...until later, make it a great day!

Friday, August 17, 2012

Scensational Season

This is a fun card I created for a swap that I participated in recently. The gate card is a fun fold to work with. It uses Be of Good Cheer dsp and Scensational Season stamp set. You can find the stamp set in the holiday mini on page 16 along with the framelits called holiday collection that match this set. I used two different patterns of dsp as you can see in this picture.
The greeting is made with the decorative label punch--it's a fun technique. It is also how the card stays shut.
And the following picture will show how it looks open.
Pursuit of Happiness is the stamp set the inside greeting comes from.

Wednesday, June 6, 2012

Bordering on Romance

Today's card uses the stamp set from the occasion's mini catalog that made our main catalog this year.  It is called Bordering on Romance; a great set for watercoloring, coloring with markers or pastels, embossing, etc.  What a wonderful set.


I love the style of these cards that have that clean and simple look with alot of white space.  I saw a card when I was blog surfing that used this layout and I just switched up the stamp set so I could use markers and some of the dazzling details.  The houndstooth embossing folder adds a great background along with the calypso coral or rose red layer made with two punched decorative label pieces put together.  The greeting comes from the Petite Pairs stamp set.